Born by smart contract

Since today, the 10th of January, the Ethereum blockchain contains a new contract. A so-called smart contract. This contract functions as the official Kaboom Shebang birth certificate. In this article, we’ll look into the creation process.
Who doesn’t love a challenge?
So this contract is a birth certificate. It contains the birthdate, birthplace, and some other birth information. But it also works as a regular computer program. A program that runs on a blockchain instead of your mobile phone or inside your browser. In our case, this program can verify if the condition of a challenge is satisfied. If this blog contains 60 well-written no-nonsense articles in precisely five years the contract will settle with the status success. So the challenge is to publish 12 articles per year, 60 in total. Therefore, the 10th of January 2027 will mark a successful first 5th anniversary or a successful failure.
Ethereum and Solidity
We’ll not go into the details of why blockchains and crypto-assets are such a hot topic. Perhaps we’ll dive deeper into this technology’s possibilities and the somewhat utopian future when everything is ’lukewarm.' No rush; Pandora’s box is open and will not close anytime soon.
Let’s continue with Solidity, the language used for writing Ethereum contracts. For those unfamiliar with these subjects: the internet is an excellent explainer.
- Read this Ethereum article from Allen Gulley
- A drag-and-drop builder: How blockchain works
- The Web3 Foundation: Blockchain for Beginners MOOC
From the Ethereum documentation: “Smart contracts are a type of Ethereum account. This means they have a balance and they can send transactions over the network.”
Let’s take a closer look into the inner workings of our contract. And hopefully, by the end of this article, we’ll better understand the “smart” part.
Let’s build a birth certificate
Deploying a contract involves several steps. Let’s start with a bit of planning. We’ll look at all the different components and requirements. And before we do any coding, we’ll lay out the contract’s functionality.
Requirements
First, we need to set up a development environment. There are multiple options regarding libraries and development tools. To name a few: VSCode-Solidity plugin, Ethers.js, Web3.js, Infura, Hardhat and Truffle. But for this guide we’ll use the “batteries-included” Remix IDE, hosted and funded by the Ethereum foundation. Check out the Remix IDE setup guide for instructions on how to set up the editor.
We also need an Ethereum wallet with an address on the Mainnet and a test network. The Metamask wallet works well with the WebIDE and has support for the Ethereum testnets. There is also support for other wallets by using the “Wallet Connect” plugin. Follow this guide to set up Metamask.
Because smart contracts are a type of Ethereum account, we also need some (fake) Ether to pay for the transaction costs of a deployment operation. Let’s get some test coins from a faucet to test out the network.
Contract functionality
So as mentioned, we want to create a birth certificate. Therefore the contract needs at least the following properties: the name of the newborn, date and time of birth, and birth location. We set ourselves a challenge, so we also have to include some information and logic about the status of the contract. So that if the “60 articles in 5-years” condition is satisfied, we can settle the contract. Something like the following example:
// pseudo code
bool success;

resolveContract(articleCount) {
	if (articlesCount > 60) {
    	success = true;
	}
    return success;
}
And of course, we have to “talk” to the contract. Keeping the contract small will make interactions with it less expensive. Operations that do not change the state do not need a transaction and therefore do not consume gas. So reading the state is a free operation, just like inspecting regular blockchain transactions with Etherscan.
Solidity programming
To create a contract, we need to write some code. You can choose between several different languages, but we’ll go for Solidity because it is widely used and specifically developed for the Ethereum blockchain. It’s an object-oriented, high-level language with a familiar syntax similar to languages like C, Python, or Javascript.
The documentation is well written, and you should definitely browse through the official style guide. This guide quickly gives a good impression of the language features and the syntax. The cheat sheet is also very helpful.
📌 The language is new and actively developed and is therefore evolving fast. If you run into issues with code copy-pasted from online examples, check out the breaking changes and the list of known bugs.
Some language concepts & syntax basics
Code layout and structure:
-
Every source file should start with:
- a license ID:
// SPDX-License-Identifier: MIT
- and a pragma directive:
pragma solidity ^0.6.0;
- a license ID:
-
Syntax case conventions:
- Use
PascalCasefor:- contract and library names
- struct names
- event names
- Use
camelCasefor function names. - Contract and library names should also match their filenames (
BirthCertificate.sol).
- Use
-
Contract state:
- no state change means no gas consumption
viewandpurefunctions do not change the state of the contractpurealso does not read from the state
-
NatSpec comments:
- a special form of tagged comments to provide rich documentation
- use
///@tag comment, or/** some comment */
Check out these learning resources. On Youtube, you can find many high-quality introductory lessons.
📌 In a shell script the interpreter directive is set by the shebang, in Solidity, we use the word
pragma.
- Pragma
- From pragmatic.
Writing the contract
Now that we have a basic understanding of the fundamental concepts, it is time to start the development with the first step: a Hello World! contract.
// SPDX-License-Identifier: MIT
pragma solidity 0.8.7;

/**
* You could use this very simple example contract to test a deploy to the Mainnet
*/

contract HelloKbsb {

    string private shebang = "#!/kaboom/shebang";

    function printShebang() public view returns (string memory) {
        return shebang;
    }
}
As a next step, walk through all the comments in the examples from the kbsb-birth-certificate Github repo.
Important considerations
Our contract should not execute before the 10th of January 2027. The Ethereum clock uses the “Universal Time Coordinated” (UTC) time zone. To use a time value in a contract, you must use the Unix timestamp notation.
You can use time.is to convert your local time to UTC. And with a Unix timestamp converter, you can calculate the value of a specific date. In our case: January-10-2027 GMT+1 (Amsterdam time).
💡 Unix time is the number of seconds passed since January-01-1970.
With block.timestamp you can get the
timestamp of the current block. For example:
pragma solidity ^0.5.2;

contract NowContract {
    uint32 public now = 0;

    constructor () public NowContract() {
        computeNow();
    }

    function computeNow() public {
        now = uint32(block.timestamp);
    }
}
Deploying the contract
The moment of truth: let’s deploy a contract. In the Remix IDE, verify that your environment is set up correctly and click on deploy.
First, test a simple deployment to get an idea of how much gas the transaction consumes. The HelloKbsb example is a good test case.
You can check the blockchain transactions on:
Or if you test on other networks:
Gas consumption
Gas fees are paid in Ethereum’s native currency, ether (ETH). Gas prices are denoted in gwei, which itself is a denomination of ETH.
Each gwei is equal to 0.000_000_001 ETH (10⁻⁹ ETH). For example, instead of saying that your gas costs 0.000_000_001 ether, you can say your gas costs 1 gwei.
The word ‘gwei’ itself means ‘giga-wei’, and it is equal to 1,000,000,000 wei.
Verifying a contract.
On the contract page on Etherscan, you can verify and publish the article so you can interact with it from the website.
- Click “Verify and Publish”
- Select the compiler type, version and license
- Enter the Solidity Contract Code
- And publish
Now you can read-from and write-to the contract directly from the Etherscan website: ReadContract
The completed birth certificate
Let’s jump right into the completed certificate. You can check out the source code of the contract on Github. Walk through the code and read the comments to understand the data flow and the logic.
The Etherscan links for this deploy:
Born by test contract
Every new technology or business has small or large hiccups. The Ethereum blockchain is no exception. Currently, the chain has some scalability problems and exceptionally high transaction fees. These problems are on the community’s radar, and it’s under active research in the form of Ethereum layer 2. Something ambitious like constructing a global decentralized virtual machine is allowed to have some growing pains.
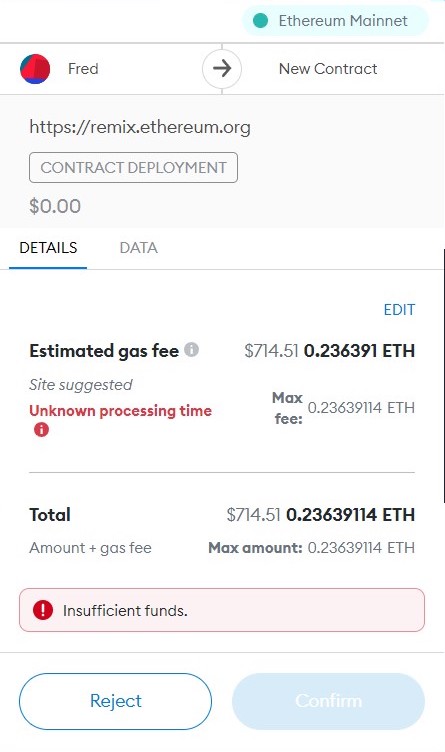
These high transaction fees ($700USD for our contract) are a barrier for small chain interactions like deploying our birth certificate. A solution from Matter Labs named zkSync seems to be a popular way to avoid the high fees. You can quickly try it by connecting your MetaMask to the zkSync wallet.
No one knows what the state of the network will be in 5-years. Hopefully, there are mature solutions to current obstacles and difficulties. This year, instead of deploying our contract to the Mainnet, we’ll deploy to the Goerli Testnet. Next year January, we’ll investigate the state of the network. If transaction costs still go through the roof, we’ll consider other blockchains as a deployment target.
<Fred>🙋🏼♂️: I also deployed to the Ropsten Testnet. Since that is an Eth2 test network, hopefully, it’s still running in 2027.
So while the title of this article says otherwise, “born by test contract” may have been more accurate. No matter the title or the deployment, the challenge remains: publish a total of sixty articles by 2027.
To be continued…
